
My go-to for desserts, this homemade graham cracker crust recipe is delicately sweet, deliciously buttery, just crumbly enough to be satisfying without losing its shape, and super versatile to suit the flavor notes of any recipe. Made with four simple ingredients, it’s easy to prepare and far better than any pre-made version you’ll ever find!

Homemade Graham Cracker Crust So Good You’ll Never Go Back to Store-Bought Again!
If you’ve never made a graham cracker crust recipe, it might seem a little intimidating. You’re probably wondering how you ever get those little crumbs to hold their shape. You might even be thinking it’s much easier to buy a crust from the store, but I promise the process is simple. And the taste and texture are worth the effort.
In no time at all, you’ll have a rich, golden graham cracker pie crust perfect for holding all your favorite dessert fillings. I’m even sharing some of my favorite flavor variations to add even more depth and deliciousness! You can’t do that with store-bought crust.
Ingredients
Honey Graham Cracker Cookies: These form the base of the crust. If preferred, you can find pre-made graham cracker crumbs in the baking aisle of your local grocery store, but I much prefer the sweet flavor of homemade varieties.
Unsalted Butter: This adds richness and moisture, combining the crust and helping it bake up nice and golden brown.
Sugar: This adds subtle sweetness, making this crust suitable for desserts, like my strawberry crisp cheesecake or passionfruit cheesecake.
Salt: Trust me on this! It won’t make the crust salty, but it is crucial for balancing the ingredients and enhancing their flavor, creating a well-rounded taste.
How to Make Graham Cracker Crust (It’s Easy!)
Step 1. Pulse your graham crackers in a food processor or blender to achieve fine crumbs. Alternatively, you can put your cookies in a gallon-size plastic bag and crush them with a rolling pin.


Step 2. Next, mix the sugar, melted butter, and salt in a mixing bowl until well combined. Make sure to crush any large chunks!

Step 3. Add the graham cracker crumbs to the butter mixture, and mix to combine, coating the graham cracker pieces evenly.


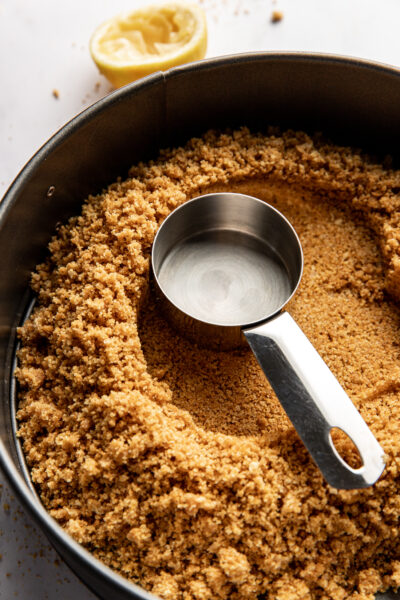
Step 4. Transfer the cookie mixture to a springform pan, and press the crumbs down along the bottom and about halfway up the sides of the pan. Be sure to pat the crumbs evenly with your hands, the back of a measuring cup, or a spoon.

Step 5. If pre-baking is required, bake the crust for about 10 minutes, then let it cool before adding the filling. For no-bake recipes, chill the crust in the refrigerator or freezer for 10–20 minutes before filling. Use the crust with your favorite recipes, like 7-layer bars, no-bake key lime pie, or mango cheesecake.

Possible Variations
Fruit Zest: Infuse the crust with lemon zest, as I do in my lemon blueberry cheesecake, or use it to enhance a lemon ice box pie. You can also use lime zest, as I do in my key lime cheesecake, or opt for orange zest for a unique treat.
Spices: Include warm spices, such as cinnamon, ginger, or nutmeg, for fall-inspired treats like my homemade salted caramel cheesecake, pumpkin cheesecake bars, easy pumpkin cheesecake, brown butter sweet potato cheesecake, or apple crisp cheesecake bars.
Sprinkles: Fold sprinkles or jimmies into the crust before baking for a pop of color and extra sweetness. It makes for fun, birthday-inspired recipes, like my birthday cake cheesecake.
Brown Butter: Want more depth or richness? Try browning your butter before combining the ingredients. This will create a slightly nutty taste, making any dessert extra delicious with hardly any additional effort.

FAQs About This Graham Cracker Crust Recipe
Do I have to pre-bake graham cracker crust?
You might be able to get away with skipping the baking time if using the crust for no-bake cheesecakes or chilled desserts, but I highly recommend taking the extra few minutes. Baking will help the crust set and hold its shape, preventing sogginess and crumbling.
Why isn’t my graham cracker crust holding together?
If your crust is crumbly or falling apart, it’s usually because there isn’t enough butter or the crumbs weren’t pressed firmly enough into the pan. Make sure your graham cracker crumbs are finely ground and fully coated with melted butter. Then, when pressing the crust into the pan, really pack it down using the bottom of a measuring cup or glass to create a compact, even layer.
Can I make homemade graham cracker crust ahead of time?
Yes! You can prepare and bake the crust up to 2-3 days in advance. Once it’s completely cooled, cover it tightly and store it at room temperature or in the refrigerator. This is a great way to get ahead when making cheesecakes or dessert bars for holidays or special occasions.
More Baking Staples
- The Best Homemade Pie Crust Recipe
- How to Make Oreo Pie Crust
- Homemade Strawberry Buttercream Frosting
- Homemade Maple Whipped Cream
- Easy Cream Cheese Frosting Recipe with Vanilla Bean
- Homemade Lime Whipped Cream

I hope you love this Homemade Graham Cracker Crust Recipe! It’s buttery, easy to make, and so versatile! If you do give this recipe a try, I want to know! Leave a comment with a star rating below. You can also snap a photo & tag @butterloveandsalt on INSTAGRAM. Your reviews help support Butter, Love & Salt and make it possible for me to continue to create delicious recipes.
Homemade Graham Cracker Crust (4 Ingredients!)
Ingredients
- 2 cups of honey graham cracker cookies about 16 full length cookies
- 1/2 cup unsalted butter melted
- 1/3 cup granulated sugar
- pinch salt
Instructions
- Place your graham crackers in a food processor or blender and grind them fine. Alternatively, you can put your cookies in a gallon-size plastic bag and crush the cookies with a rolling pin until fine.
- In a medium-sized bowl, add the sugar, melted butter, and salt. Mix until well combined. Be sure any large chunks are crushed.
- Next, add the graham cracker crumbs and mix well. Then, pour your cookie mixture evenly into a 9-inch springform pan (You can also use any other dish). Press the crumbs down along the bottom and side of the pan (about halfway) to form the crust. Be sure to pat the crumbs evenly. Alternatively, you can use the back of a measuring cup or spoon to pat the crumbs and form the crust.
- If pre-baking is required, bake the crust at 350°F for about 10 minutes, then let it cool completely before adding the filling. For no-bake fillings, chill the crust in the refrigerator or freezer for 10–20 minutes before filling.


Rate & Review
What did you think of this recipe?