
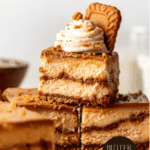
These Biscoff Cheesecake Bars are a cookie butter lover’s dream come true. A buttery brown butter Biscoff crust is layered with creamy Biscoff cheesecake, a ribbon of melted cookie butter and cookies, a layer of cookie butter, and finished with Biscoff whipped cream and a crumbly cookie topping. As beautiful as they are decadent, these dessert bars are perfect for holidays, dinner parties, or any time you’re craving something cozy and sweet!

Why You’ll Love These Biscoff Cheesecake Bars
The only thing better than Biscoff cookie butter? Biscoff cookie butter cheesecake, obviously! If you’re as obsessed with the sweet spread as I am, these bars are guaranteed to become your new favorite dessert.
They take everything you love about a classic cheesecake and add layers of warm spices, extra sweetness, and a little crunch. With my foolproof tips and tricks, I’ll show you how to prevent cracking, create a soft filling, and a crumbly crust that looks almost too good to eat. Serve them at your next party, and sit back as your guests sing your praises!
More Reader Favorite Cheesecake Bars
- Sweet Potato Cheesecake Bars with Maple Whipped Cream
- Apple Crisp Cheesecake Bars
- Pumpkin Cheesecake Bars with Maple Whipped Cream
- Mini Oreo Cheesecakes with Oreo Crust
- Birthday Cake Cheesecake with Edible Cookie Dough
- Key Lime Cheesecake

Ingredients You’ll Need
Cream Cheese Filling
Cream Cheese: The base of every good cheesecake recipe! This creates a thick texture and adds the tangy flavor we need. For the best results, use full-fat, brick-style cream cheese, not cream cheese from a tub, and let it soften for easy mixing.
Large Eggs: These create a custard consistency and act as a binder, preventing the cheesecake from falling apart.
Granulated Sugar: Sweetens the filling.
Sour Cream: This is my secret to achieving restaurant-quality flavor! The sourness adds another layer to the tanginess of the filling while enhancing the creamy consistency and actually helps temper the cream cheese, softening its texture.
Biscoff Cookie Butter: This is a type of spread made primarily out of Speculoos cookie crumbs. It’s sweet with warm notes that lend incredible flavor to these Biscoff cheesecake bars!
Vanilla Bean Paste: This adds a rich, aromatic vanilla flavor that gives the filling a luxurious taste that’s bolder than you would get with vanilla extract.
Crust
Biscoff Cookies: These form the base of the crust. Crush whole Biscoff cookies into fine crumbs.
Unsalted Butter: Once melted, this combines the ingredients, adding rich flavor and creating a cohesive crust.
Cookie Layer
Reserved Cookie Crust Mixture: This adds texture and enhances the cookie flavor.
Biscoff Cookie Butter: Swirled into the cheesecake, this adds a smooth, creamy layer that makes these cheesecake bars to-die-for.
Toppings
Biscoff Whipped Cream: Combine Biscoff cookie butter, powdered sugar, and heavy cream for a sweet, fluffy whipped cream infused with cookie butter flavor.
Biscoff Topping: Biscoff cookie butter, halved Biscoff cookies, and crushed Biscoff cookies make for the perfect finishing touches.
How to Make Biscoff Cheesecake Bars
Step 1. Make the brown butter. Cut the butter into small pieces and heat it in a large pot or Dutch oven over medium heat until it turns amber brown. Once the butter is browned, the popping slows, and it has a nutty aroma, it’s ready. Remove it from the heat, and set it aside to cool.

Step 2. Prepare the crust. Next, mix Biscoff crumbs and brown butter in a bowl. Then, press the mixture firmly into the bottom of a square baking pan lined with parchment paper. Bake until lightly golden, and set aside.

Step 3. Make the filling. Beat the cream cheese and sugar in a large bowl until very smooth. Then, add the sour cream, vanilla paste, and Biscoff, and mix until fully incorporated. Stop and scrape the sides of the bowl as needed! Add the eggs one at a time, beating until just combined.

Step 4. Bake. Pour half the cheesecake filling over the prepared crust. Then, spread the reserved cookie crust evenly over the filling, and drizzle the melted cookie butter on top. It won’t fully cover every part of the cheesecake! Pour the remaining cheesecake filling over the cookie layer, spreading it out evenly. Bake until the edges are set and the center jiggles.
Step 5. Cool. Turn off the oven, and crack the door, letting the cheesecake rest. Then, transfer the cheesecake to the counter to cool at room temperature before moving it to the fridge to chill, ideally overnight.


Step 6. Make the Biscoff topping. Pour the melted Biscoff cookie butter over the set cheesecake. Then, return it to the fridge, allowing the cookie butter to set.

Step 7. Make the Biscoff whipped cream. Add the whipped cream ingredients to a large bowl, and whisk until the ingredients are fully incorporated and the mixture holds medium peaks.


Step 8. Assemble. Remove the Biscoff cheesecake bars from the pan, and slice them into squares. Pipe a generous amount of Biscoff whipped cream topping. Then, garnish with crushed cookies, and top each bar with half of a Biscoff cookie. For even more Biscoff goodness, top the cheesecake pieces with a drizzle of melted Biscoff cookie butter, and enjoy!

Tips & Tricks for this Biscoff Cheesecake Recipe
- Use room temperature ingredients to bake your Biscoff cheesecake, which helps to ensure your cheesecake won’t crack.
- Don’t overmix your filling. Overmixing can lead to cracks.
- Don’t overbake. You know the Biscoff cheesecake is ready when the sides are set and the center has a little jiggle.
- Before removing the cheesecake bars, run a knife around the edges of the pan. This prevents sticking and cracking.
- Heat the cookie butter in a microwave-safe bowl for about 15-30 seconds or until melted, stirring occasionally.

How to Prevent Cracking
Cracking in your Biscoff cheesecake isn’t the end of the world, but there are a few steps you can take to avoid it!
- Avoid overmixing the filling. Blend just until the ingredients are smooth. Continuing to mix will introduce too much air into the mixture. Excess air can cause the cheesecake to rise as it bakes, only to deflate and crack as it cools. To help the process, allow your ingredients time to come to room temperature before you begin.
- Resist the urge to open the oven during baking. Unlike cookies or brownies, which can withstand a little temperature change, cheesecakes cannot. The rush of cold air is one of the most common reasons cheesecakes crack!
- Take your time. Avoid rushing the cooling process for all the layers, but especially the filling. Removing it from the oven too soon will have the same result as opening the oven door while it bakes, causing a drastic temperature change that makes the filling crack.

How to Store Biscoff Cheesecake
Store leftover bars covered in the refrigerator for up to 5 days. Or, leave off the toppings, and freeze individually wrapped bars for up to 3 months. Thaw in the fridge overnight, and add the toppings when you’re ready to serve.
More Reader Favorite Cheesecake Recipes
- Lemon Blueberry Cheesecake Recipe
- Oreo Cheesecake Recipe
- Brown Butter Sweet Potato Cheesecake Recipe
- Easy Pumpkin Cheesecake Recipe
- Homemade Salted Caramel Cheesecake
- Easy Mini Cheesecake Recipe

I hope you love my Biscoff Cheesecake Bars recipe! It’s sweet, spiced, and loaded with showstopping toppings! If you do give this recipe a try, I want to know! Leave a comment with a star rating below. You can also snap a photo & tag @butterloveandsalt on INSTAGRAM. Your reviews help support Butter, Love & Salt and make it possible for me to continue to create delicious recipes.

Biscoff Cheesecake Bars with Biscoff Whipped Cream
Ingredients
Cream Cheese Filling
- 16 oz cream cheese (2 blocks) room temperature
- 2 large eggs room temperature
- 2/3 cup granulated sugar
- 1/2 cup sour cream room temperature
- 1/2 cup Biscoff cookie butter
- 2 tsp vanilla bean paste
Crust
- 8.8 oz Biscoff cookies 1 package of Lotos Biscoff or about 2 cups of Biscoff crumbs
- 1/2 cup unsalted butter
- reserve 2/3 cups of crust mixture for Cookie Layer
Cookie layer
- 2/3 cup reserved cookie crust mixture
- 1/3 cup Biscoff cookie butter melted
Biscoff Whipped cream
- 1/4 cup Biscoff cookie butter
- 1/4 cup powder sugar
- 2 cup heavy cream cold
Biscoff Topping
- 1/2 cup of Biscoff cookie butter melted for topping
- Biscoff cookies halved for topping
- Crushed Biscoff cookies garnish
Instructions
Make Crust
- Make the brown butter. Cut the butter in small pieces and heat the butter in a large pot or dutch oven on medium heat for about 3-5 minutes until the butter turns an amber color. The butter will first foam and start to pop. Then, brown bits will begin to form in the bottom of the pan. Once browned and popping slows, it is ready. You should smell a nutty aroma. Remove from heat and set aside.
- Next, mix Biscoff crumbs and brown butter in a bowl until well combined. Set about 2/3 cups of the mixture aside. Then, press the remaining mixture firmly into the bottom of an 8×8 inch square baking pan with parchment paper (leaving an overhang on two sides for easy lifting). Bake for about 10 minutes in a preheated oven at 350F. Once baked, set aside to cool slightly. Reduce the oven temperature to 325F.
Make the Biscoff Cheesecake Filling
- In a large bowl, beat the room temperature cream cheese and sugar on medium high until very smooth (about 2 minutes). Add sour cream, vanilla paste, and Biscoff to the filling. Mix on medium high until fully incorporated, occasionally scraping the sides. Then, add eggs one at a time, beating just until combined (don’t overmix to avoid cracks).
Assemble & Bake.
- Pour half of the filling over the crust. Then, create the cookie layer by adding the reserved cookie crust even over the bars. Next, drizzle the melted cookie butter on top. Try to even distribute the cookie butter as much as butter, but note, it will not fully cover every part of the cheesecake. Then, pour the remaining cheesecake filling over cookie layer. Use an offset spatula to carefully spread the cheesecake over the cookie to ensure it is completely covered and smooth on top. Tap the pan gently on the counter to release air bubbles.
- Bake the cheesecake for 25-30 minutes, or until the edges are set and the center jiggles (it should be a bit jiggly like jello). Once your cheesecake is done, turn the oven off and crack the oven door. Leave the cheesecake in the oven for at least 30 minutes. Then, remove the cheesecake and let the cheesecake rest on the counter at room temperature for at least 1 hour. Then, transfer to the refrigerator, uncovered, for at least for 4 hours or overnight.
Make the Biscoff Topping.
- Once the cheesecake has set, take the cheesecake out of the refrigerator. Pour the melted Biscoff cookie butter over the cheesecake and spread evenly with an offset spatula. Then, return the cheesecake to the refrigerator for about 30 minutes or until the cookie butter is set.
Make the Biscoff Whipped Cream.
- When you are ready to serve, make the Biscoff Whipped Cream topping. In a large (preferably chilled) bowl, add the cookie butter, powder sugar and heavy cream and whisk on medium-high speed until the ingredients are fully incorporated and it holds medium peaks (about 4-5 minutes). Be sure not to over mix.
Assemble.
- Next, remove the cheesecake from the pan (to ensure easy release from the pan, run a warm knife around the edges to loosen it). Use the parchment overhang to lift bars out of the pan. Slice the cheesecake into squares with a warm, clean knife for smooth edges and pipe on a generous amount of Biscoff whipped cream topping. Then, garnish with crushed cookies and top with half of a Biscoff cookie. For more Biscoff goodness, top the cheesecake pieces with a drizzle of melted Biscoff cookie butter right before serving (note, it will solidify once cooled).
Nutritional Information
Recipe by: Chavez Adams / Butter, Love & Salt | Photography by: Meg McKeehan.


Very yummy! Made twice over the holidays. Springform pan is mentioned at the end of the recipe but earlier instructions say to use a 8×8 pan- typo?
Hey! So glad you liked this recipe! Yes, definitely a typo! Thanks!
I have a friend who is incredibly hard to impress, especially with food and she said “save this one and make it again” which I consider to be the highest of praises. Absolutely no notes for the recipe itself, perfection! If had to make a recommendation (and please hear me say this as a very grateful consumer of free recipes) I think it would be really helpful to list the ingredients in order of use throughout the recipe. I had to read and reread a few times and I think a simple reordering could be helpful for those of us less familiar with the process. Super grateful for your work!
Thanks for your feedback, Summer! So glad you enjoyed this recipe! I will definitely keep that in mind!
You forgot to post the recipe on the recipe card there’s no directions!
Thank you so much, Jackie! I just updated the recipe card. I hope you enjoy!